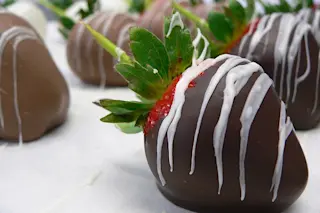
Photo credit: Jesús Rodriguez (hezoos/Flickr) Chocolate-covered strawberries have an innate beauty in their simplicity, making this snack both sweet and decadent. But this gourmet treat does not have to be expensive nor only savored at special events. Although it’s not quite as simple as dipping strawberries into soupy chocolate sauce, you can easily make chocolate-covered strawberries in your very own kitchen with a basket of strawberries, a bag of chocolate, and a little patience. To perfect the crafting of chocolate-covered strawberries, it helps to first consider the composition of chocolate. Chocolate contains only a few ingredients: fat, sugars, proteins, and soy lecithin as emulsifier that holds everything together [1,2]. Cocoa butter, a fat that is derived from cocoa beans, makes up the majority of chocolate. Like many vegetable fats, cocoa butter is a mixture of fatty molecules called triacylglycerols. Different types of triacylglycerols—saturated, monounsaturated, polyunsaturated—have their own thermal and structural properties. Roughly 80% of cocoa butter are monounsaturated triacylglycerols [3]. The secret to chocolate perfection lies in the microscopic arrangement of these molecules. The texture (smooth vs. lumpy), appearance (glossy vs. dull), and melting temperature of chocolate (in your mouth at 98°F vs. in your hand at 82°F) all depend on how triacylglycerols pack together in the finished chocolate product. Triacylglycerols are elongated, spindly molecules that can be packed together in different ways, sort of like long, skinny Legos. The three main ways that triacylglycerols can pack together are named α, β’, and β [3]. A pure mixture of triacylglycerols will form the most stable structure, β [4], and quality chocolate that is hard, smooth, and shiny will predominantly contain this β structure. Unfortunately, cocoa butter isn’t purely one type of triacylglycerol: while the 80% monounsaturated triacylglycerols will tend to pack together nicely into perfect β structures, the other 20% of cocoa butter fat molecules can interfere and lead to less stable α or β′ structures. As shown in Table 1, chocolate can take on different combinations of α, β′, and β structures, categorized in order of increasing stability as crystals I-VI [2,3]. Crystal V possesses only the β structure, and so it boasts the most desirable chocolate characteristics, such as good sheen, satisfying snap, and melt-in-your-mouth smoothness. Table 1. Properties of chocolate crystals (adapted from [2]).
CrystalStructureMelting Temp (°F)Chocolate Characteristics
Iβ′sub(α)63Dull, soft, crumbly, melts too easily
IIα70Dull, soft, crumbly, melts too easily
IIIβ′279Dull, firm, poor snap, melts too easily
IVβ′182Dull, firm, poor snap, melts too easily
Vβ293Glossy, firm, best snap, melts near body temp
VIβ197Hard, takes weeks to form
Unfortunately, getting chocolate to form the desired crystal type is easier said than done. When chocolate is melted and then left alone to re-harden on its own terms, uncontrolled crystallization occurs: any and all of the six crystal types will form at random. Chocolate that has been allowed to set this way ends up clumpy and chalky. To control crystallization and select for crystal V, the chocolate must be tempered. Through the tempering process, chocolate is first heated to 110-130°F to melt all the different crystal types. Most importantly, the temperature has to be higher than 82°F to melt the inferior crystals I-IV. Melted chocolate is then cooled down by adding “seeds” of chocolate that already contain only crystal V. These seeds are usually just pieces of chocolate that has already been tempered. Any piece of chocolate—chips, buttons, or chopped— can be used, as the majority of chocolate on the market has already been tempered. These seeds slowly cool the melted chocolate and act as a molecular template from which additional crystal V structures can grow [3]. As the chocolate cools, the stable crystal V will come together into a dense, even network, creating that lustrous, firm chocolate coating. http://www.youtube.com/watch?v=h_evlqvYZOM But beware: a drop of water can ruin all that hard work and perfectly tempered chocolate by causing it to seize. During the manufacturing process, water is removed from the chocolate, leaving behind a blend of fats and sugars. Introducing water to melted chocolate causes the sugar molecules to clump together in a process known as seizing [1]. These wet, sticky sugar clusters result in a grainy, thick batch of chocolate. http://www.youtube.com/watch?v=cV-T9-H90pA Seizing can happen when chocolate is melted in a double boiler, as water from the steam can get into the chocolate. It can also happen when pockets of chocolate are accidentally burnt. Burning is a chemical reaction that oxidizes the fats and sugars to produce carbon dioxide and water. Water that forms in the burnt pockets of chocolate will cause the rest of the batch to seize. But have no fear! Seized chocolate is not completely ruined: it can be saved by adding even more water or other liquids such as cream. Though it may seem counterintuitive, adding more water actually dissolves the sugar clumps, breaking them apart so that the chocolate can become smooth and creamy again [1]. Unfortunately, because there is now moisture in the chocolate, it will not dry and harden into a chocolate shell anymore. Chocolate rescued in this way can be used for hot chocolate, icings, fillings, or ganaches, which means you can still make an impressive chocolate treat even if the chocolate-covered strawberries don’t work out.
Chocolate-Covered Strawberries 1 lb. strawberries 16oz milk chocolate chips Thermometer (optional, but would be helpful) 1. Melt half to two-thirds of the chocolate chips...
...In a double boiler: Stir constantly. Be sure steam doesn’t escape and sink into the chocolate. Do not cover.
...In the microwave: Heat on high 1 minute. Do not cover. Remove from the microwave and stir. If all the chocolate has not melted, heat again for 5-10 seconds. Repeat until completely melted Note: If possible, avoid using a heat-retaining container like glass, which may burn the chocolate. Plastic is preferred.
2. Once completely melted, carefully continue heating until the temperature is 90-95°F.
3. Remove from heat, then add chocolate chips. Stir until the chips have melted and the chocolate is 82-88°F.
4. To test if the chocolate is ready, spread a thin layer on the back of a spoon or a piece of paper. It should harden in less than 3 minutes. If it doesn’t, stir in more chocolate chips.
5. When the chocolate is ready, carefully dip in strawberries. Make sure the strawberries are dry, before dipping. Allow dipped strawberries to dry on a sheet of parchment paper.
References Cited
Corriher, S. Chocolate, Chocolate, Chocolate. American Chemical Society: The Elements of Chocolate. October 2007; <http://acselementsofchocolate.typepad.com/elements_of_chocolate/Chocolate.html>
Loisel C, Keller G, Lecq G, Bourgaux C, Ollivon M. Phase Transitions and Polymorphism of Cocoa Butter. Journal of the American Oil Chemists’ Society. 1998; 75(4): 425-439.
Rowat A, Hollar K, Stone H, Rosenberg D. The Science of Chocolate: Interactive Activities on Phase Transitions, Emulsification, and Nucleation. Journal of Chemical Education. January 2011; 88(1): 29-33.
Weiss J, Decker E, McClements J, Kristbergsson K, Helgason T, Awad T. Solid Lipid Nanoparticles as Delivery Systems for Bioactive Food Components. Food Biophysics. June 2008; 3(2): 146-154
Alice Phung once had her sights set on an English degree, but eventually switched over to chemistry and hasn't looked back since.

(Courtesy Alice Phung)
About the author:


